
Not every fiber job comes with a fusion splicer. Whether you’re working a tight-deadline repair, a field termination without the full kit, or a temporary indoor run, you need a reliable backup plan, and mechanical splicing is exactly that.
In this guide, we’ll walk you through exactly how to splice fiber without a fusion splicer, covering the tools you need, the step-by-step process, performance specs, and common mistakes to avoid. By the end, you’ll be equipped to make clean, low-loss connections in any field scenario.
What is a Mechanical Splice in Fiber Optics?
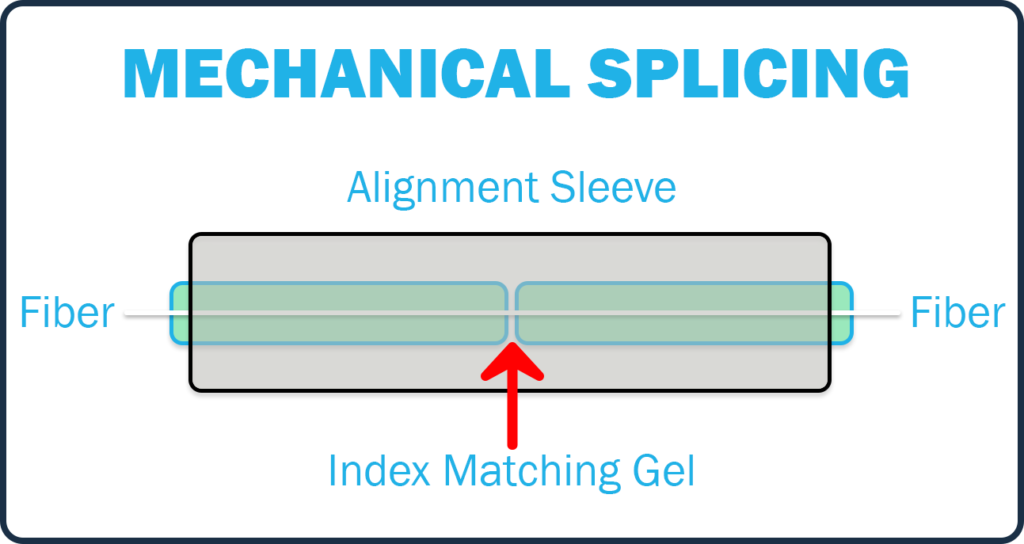
A mechanical splice joins two optical fibers by physically aligning them inside a precision connector or sleeve, without applying any heat. Instead of fusing the glass together as a fusion splicer does, the fibers are held in alignment so light can pass cleanly from one to the other.
Inside the connector, an index-matching gel fills the gap between the fiber ends, reducing signal loss and minimizing back reflection. The result is a low-loss connection that works reliably for a wide range of indoor and field applications.
Key Advantages of Mechanical Splicing?
- No fusion splicer required
- Fast and field-friendly installation
- Reusable and adjustable connections
- Lower equipment cost vs. fusion splicing setup
Mechanical Splicing vs. Fusion Splicing
Understanding when to use each method is important for choosing the right approach for your project.
FEATURE | MECHANICAL SPLICING | FUSION SPLICING |
|---|---|---|
Equipment Required | Cleaver + Stripper | Fusion stripper + Accessories |
Installation Speed | Very fast | Moderate |
Insertion Loss | Typical 0.1 db | Typical < 0.1 db |
Connection Type | Adjustable / reusable | Permanent |
Best For | Field, repairs, temp runs | Backbone, long-haul |
Equipment Cost | Low | High |
While fusion splicing delivers lower insertion loss and is preferred for permanent backbone installations, mechanical splicing is the practical choice whenever speed, flexibility, or equipment access is a constraint.
When to Use Mechanical Splicing?
Mechanical splice connectors are the right call for:
Field terminations where fusion equipment isn’t available
Emergency fiber repairs that need to happen now
Indoor short-to-medium distance installations
Temporary connections for testing or troubleshooting
This makes them a go-to solution for technicians who need fast, reliable results under real-world constraints.
Tools Required
To complete a proper mechanical splice termination, you’ll need:
Having all materials ready and clean before you begin will save time and reduce the chance of errors.
Watch Step-by-Step Installation Video
See the full mechanical splice process in action. This official Vertical Cable demo walks through each step using the 265-MEC01-C connector.
The steps below follow the same process shown in the video. Use them as a written reference alongside the demo.
Step-by-Step: How to Terminate Mechanical Splice Connectors
Your mechanical splice connector is installed. Test with an OTDR or power meter to verify insertion loss meets spec before deployment.
Performance Specifications: What to Expect
High-quality mechanical splice connectors are designed to deliver consistent, reliable performance for their intended applications. Here's what you can expect from a properly installed splice:
SPECIFICATION | VALUE |
|---|---|
Insertion Loss (Maximum) | 0.3 dB |
Insertion Loss (Typical) | 0.1 dB |
Return Loss | 45 dB or greater |
Tensile Strength | Up to 4 N (0.9 lbf) |
Lower insertion loss and higher return loss indicate better signal performance. While fusion splicing achieves lower overall loss, mechanical splicing delivers excellent results for most field applications and short- to medium-distance installations.
Common Mistakes to Avoid
Even experienced technicians can run into issues. Watch out for these frequent errors:
- Not Fully Removing the Fiber Coating — partial coating removal leads to misalignment and high loss
- Skipping the Cleaning Step — contamination on the fiber end face is a primary cause of poor performance.
- Poor or Angled Cleave — a rough or non-perpendicular cleave increases insertion loss significantly,
- Closing the Connector Before Full Insertion — the fiber must be fully seated before locking
Avoiding these mistakes consistently leads to cleaner connections and more reliable performance across every installation.
Bulk Fiber Compatibility
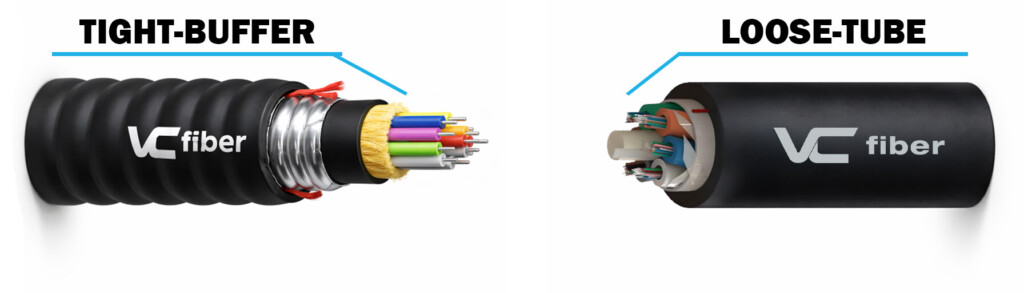
Mechanical splice connectors are compatible with two common fiber types:
- Loose tube fiber (250 micron) — requires the build-up sleeve for proper diameter and alignment
- Tight-buffered fiber (900 micron) — terminates directly without a sleeve
This dual compatibility makes mechanical splicing suitable for both outside-plant installations with loose-tube cable and indoor runs with tight-buffered fiber.
Industry Standards and Best Practices
Professional fiber installations should follow established industry guidelines. BICSI, TIA, and CEDIA all publish standards covering fiber handling, termination, and performance verification. These guidelines consistently emphasize proper fiber preparation, accurate cleave length and alignment, minimizing insertion loss, and using approved components, ensuring consistent network performance and long-term reliability.
Frequently Asked Questions
Can you splice fiber without a fusion splicer?
Yes. Mechanical splice connectors allow you to join fibers precisely without heat or expensive fusion equipment, making them ideal for field installations and repairs.
Is mechanical splicing reliable?
Mechanical splicing is reliable for indoor and short- to medium-distance applications. While insertion loss is slightly higher than fusion splicing, it performs well when the fiber is properly prepared and the connector is correctly installed.
What is insertion loss in fiber splicing?
Insertion loss is the amount of optical signal lost as light passes through a splice. It's measured in decibels (dB); lower values indicate better performance. For mechanical splices, a typical value is 0.1 dB.
When should I use mechanical instead of fusion splicing?
Mechanical splicing is the best choice when a fusion splicer is not available, when speed and simplicity are priorities, or when the installation is temporary, short-distance, or requires a reusable connection.
What cleave length should I use for mechanical splicing?
For 900 micron tight-buffered fiber, set your cleaver to 9 mm. For 250 micron loose tube fiber, use 13 mm. Always verify these values against the connector manufacturer's specifications.